WhiteBlaze Pages 2024
A Complete Appalachian Trail Guidebook.
AVAILABLE NOW. $4 for interactive PDF(smartphone version)
Read more here WhiteBlaze Pages Store

Results 1 to 9 of 9
  1. #1
    Registered User
    Join Date
    09-18-2004
    Location
    Berkeley, CA
    Age
    65
    Posts
    203
    Images
    2

    Default "Trail Designs 12-10"-style stove

    I've now made a couple Caldera clones and I'd love to know how to make the stove real Caldera Cones come with. I've made a kitten stove (thanks to instructions on this site!) and it seems to work pretty well with the clones.

    But I'd really like to try making a 12-10 style stove. I've looked at photos and will probably just wing it, but thought I'd ask the thousands of myog stovies here to add their 2 cents.

    Has anyone made one?

  2. #2
    Registered User
    Join Date
    01-23-2006
    Location
    Melbourne,Australia
    Age
    68
    Posts
    2,851

    Default

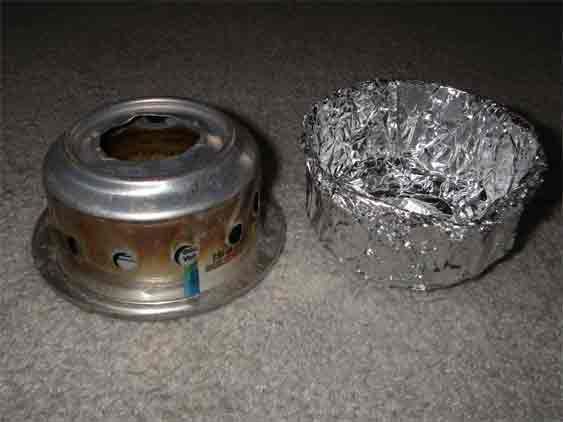
    The 12-10 (as far as I can see) is made out of 3 parts :
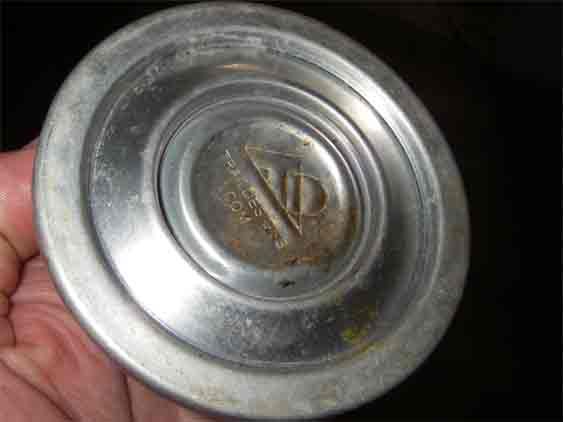
    the bottom of a standard 12oz can, an inner sleeve from a 5.5oz can and a stamped base most likely also from the base of a standard can.
    The tricky bit is the base..

    The outside can and the inner sleeve are jammed inside those grooves.

    Personally I think that apart from having fun trying, the cheapest way would be to just buy one.
    After all the guys at Trail Design deserve it.
    Franco

  3. #3
    Registered User
    Join Date
    09-18-2004
    Location
    Berkeley, CA
    Age
    65
    Posts
    203
    Images
    2

    Default

    Franco - Thanks for the info and the photo. I threw together a stove with those types of cans but no bottom or priming pan. I just used aluminum tape on the bottom.

    Without the bottom the outer can is too flimsy. So, next I'm going to make another kitten stove with the outer can's 12 holes mid-height and with 10 holes in the inner can. You know: 12+10 holes located like on the 12-10 stove.

    The little cat food can in the kitten stove is much sturdier. And I can use the bottom 1.5" of a soda can as a snuffer (and backup stove). That way I can overfill the stove, boil water, snuff the flame, suck up the remaining fuel with a syringe, and put back into my fuel bottle.

    I was reading online about how overfilling the stove makes it burn more efficiently. And I won't need to measure the fuel going in!

  4. #4
    Registered User
    Join Date
    09-18-2004
    Location
    Berkeley, CA
    Age
    65
    Posts
    203
    Images
    2

    Default

    Can you edit these posts? Don't see how.

    Anyway, the ultimate reason not to buy a 12-10 stove from Trail Designs is they don't sell them without a cone. And I'd rather make my own clones for a buck a piece and for as many pots as I want.

  5. #5
    Registered User Skidsteer's Avatar
    Join Date
    10-25-2005
    Location
    Skitt's Mountain, GA
    Posts
    7,945
    Images
    361

    Default

    I think you'll find the Kitten stove is more effecient(because the holes in the outer can are at the bottom instead of middle), as light or lighter than the 12-10, and as durable. The stovetop to pot bottom measurement may need tweaked a bit.

    It sounds like a fun project.
    Skids

    Insanity: Asking about inseams over and over again and expecting different results.
    Albert Einstein, (attributed)

  6. #6
    Registered User
    Join Date
    01-23-2006
    Location
    Melbourne,Australia
    Age
    68
    Posts
    2,851

    Default

    "snuff the flame, suck up the remaining fuel with a syringe, and put back into my fuel bottle. "
    If you have a "snuffer" than you should not need the syringe. Just pour the fuel from your burner into the snuffer and then from the suffer back into the fuel container. That is what I do with the 12-10.

    Franco

  7. #7
    Registered User
    Join Date
    09-18-2004
    Location
    Berkeley, CA
    Age
    65
    Posts
    203
    Images
    2

    Default

    Skidsteer - Good tip about the holes. I really don't have any idea what makes stoves more efficient! I've already made a Kitten stove with the holes low, so I'm set.

    Franco - With all those holes everywhere I didn't think I could pour leftover alcohol out of the stove. I just tried it and it works well enough. Thanks for the idea: saves taking and fussing with the syringe!

  8. #8
    Registered User
    Join Date
    01-23-2006
    Location
    Melbourne,Australia
    Age
    68
    Posts
    2,851

    Default

    Sierra Doug
    I made a snuffer first for a SuperCat stove. That was a bit tricky to snuff because of the wide flames. Speed and precision were involved...
    To do that one I wrapped a bit of thin cardboard over the SuperCat, then shaped the foil over that.
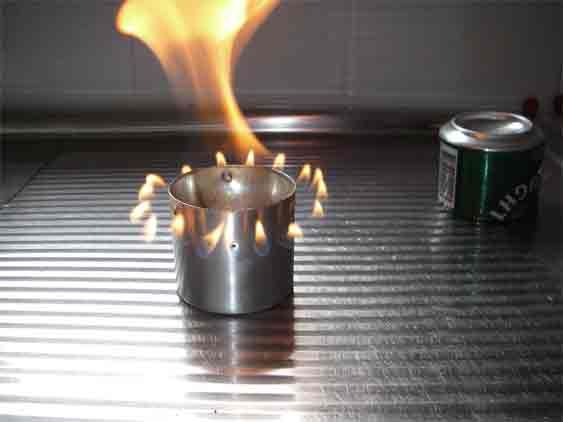
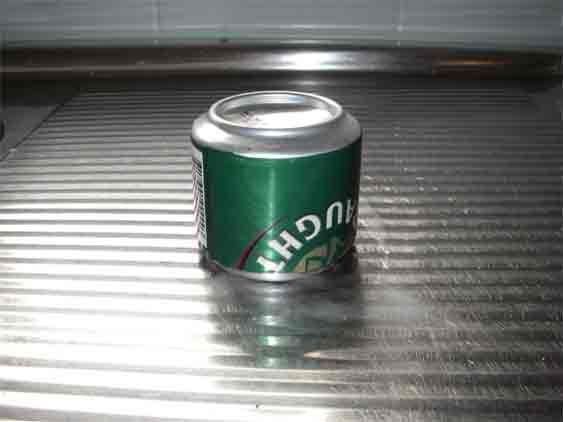
    Then I did one for the White Box stove. This one is really easy because a standard can fits slightly loosely over it making it easy to slide it over and snuff the flame.
    Here is the WB snuffer in action :


    Franco

  9. #9
    Registered User
    Join Date
    09-16-2010
    Location
    Medicine Lodge, Kansas
    Posts
    2

    Default

    Quote Originally Posted by sierraDoug View Post
    I've now made a couple Caldera clones and I'd love to know how to make the stove real Caldera Cones come with. I've made a kitten stove (thanks to instructions on this site!) and it seems to work pretty well with the clones.

    But I'd really like to try making a 12-10 style stove. I've looked at photos and will probably just wing it, but thought I'd ask the thousands of myog stovies here to add their 2 cents.

    Has anyone made one?

    I made one that is probably bigger, but it seems to function really well. I can get pics taken and posted tonight. but basically it's 2 Arizona Tea cans, I don't remember the size, but their the tall ones, and a 5.5 oz juice can.

    I cut the bottom off of one arizona can at about .5 inches. This is the base. I cut the bottom off the other arizona can, I don't remember the dimensions exactly, but I think it was at about 2 inches. I cut a hole in the bottom of this one that was an inch in diameter, and punched 12 holes close to the open end every .75 inches. I then cut off the 5.5 ounce can at what I thought would be a good height, and punched 10 holes in it around the top of the fuel cup.

    The 5.5oz can fits snugly in the indention of the upside down .5 inch tall base. Then just slide this up inside of the top until it bottoms out.

    If you need pictures, I'll try to take some and post them tonight. The hardest part is the center hole.

    SHI-Warlock

++ New Posts ++

Posting Permissions

  • You may not post new threads
  • You may not post replies
  • You may not post attachments
  • You may not edit your posts
  •