WhiteBlaze Pages 2024
A Complete Appalachian Trail Guidebook.
AVAILABLE NOW. $4 for interactive PDF(smartphone version)
Read more here WhiteBlaze Pages Store

Page 3 of 4 FirstFirst 1 2 3 4 LastLast
Results 41 to 60 of 70
  1. #41
    Registered User aclawrence's Avatar
    Join Date
    05-11-2013
    Location
    Florence, AL
    Age
    41
    Posts
    24

    Default

    Hey Zelph, I just received my 10cm earlier today. I will second everyone else that the lid fits great. Thanks for the deal. I was also going to ask about the handle being hot. I am new to alcohol stoves. I am using a fancy feast stove I made and it seems like the flames are reaching past the edges and going up the sides of the pot. Do any of you have any recommendations for a better stove for the 10cm pot or is this normal? The pot was to hot to pick up for at least twenty minutes but I did probably have twice the fuel I needed.

  2. #42
    Registered User
    Join Date
    06-12-2006
    Location
    northern illinois
    Posts
    4,536
    Images
    2

    Default

    Quote Originally Posted by aclawrence View Post
    Hey Zelph, I just received my 10cm earlier today. I will second everyone else that the lid fits great. Thanks for the deal. I was also going to ask about the handle being hot. I am new to alcohol stoves. I am using a fancy feast stove I made and it seems like the flames are reaching past the edges and going up the sides of the pot. Do any of you have any recommendations for a better stove for the 10cm pot or is this normal? The pot was to hot to pick up for at least twenty minutes but I did probably have twice the fuel I needed.
    Use only a half ounce of fuel and see how that burns for you. If the flame go out from under the pot alittle and up the side a little that's ok. Too much fuel in it will give a hotter burn. Follow the directions given with the stove. Pour in fuel, place pot on stove, light the area where you can see the white wick material. Pot goes on first, then light. Keep windscreen at least 1" from pot all the way around. No gaps in the windscreen. You need to get one of those silicone handle grabbers as shown in my previous comment.

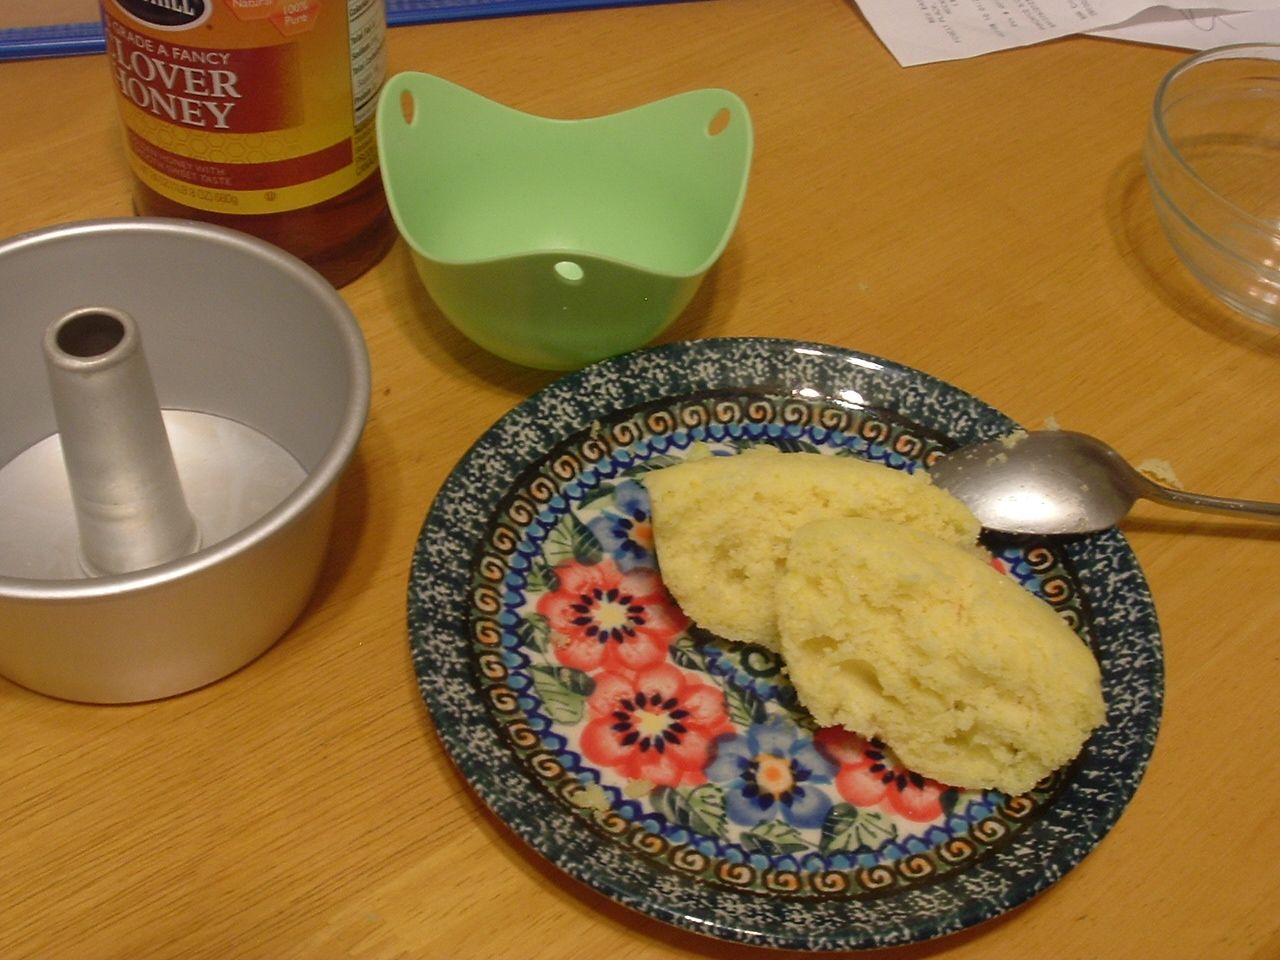
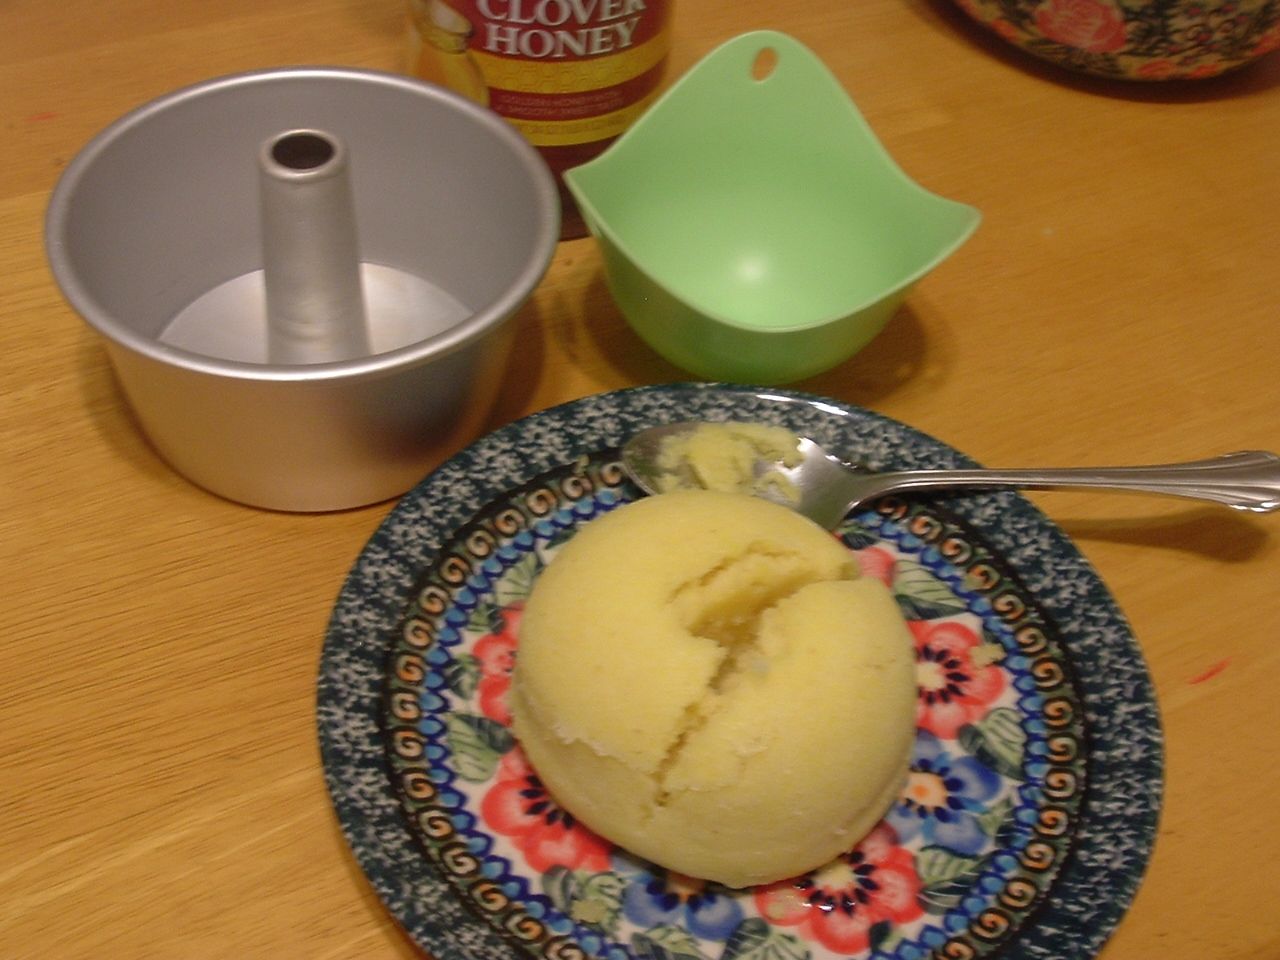
    At least a year ago I had the idea to make muffins in silicone egg poaching cups. I found them yesterday and tried them out today with Jiffy corn bread mix. Used the 10cm Imusa and steam bake method. It was my first try, used all the batter up. The last one came out perfect.


  3. #43
    Registered User aclawrence's Avatar
    Join Date
    05-11-2013
    Location
    Florence, AL
    Age
    41
    Posts
    24

    Default Black Friday Imusa Mug with Lid

    Hey Zelph, I don't actually have a Fancy Feast stove you sale. Sorry for using your stove name but thanks for the pointers. It's just a diy that I just punched some holes in. I did buy a silicone pot grabber at wal-mart today. I also found a couple aluminum pots at a Bargain Hunt today that I thought looked pretty cool. I'm not sure if they would be good for any type of steam baking like you were talking about. They are a little thicker aluminum than the Imusa pot. I don't know if they will nest inside because I did not buy them but I think I will go back and pick one up. I'll see if I can upload a pic from my phone. See what ya'll think.

  4. #44
    Registered User
    Join Date
    06-12-2006
    Location
    northern illinois
    Posts
    4,536
    Images
    2

    Default

    Ok, DIY Fancee Feests have to have the white fiberglass from the automotive stores. It has to be wound tight on the pot support and not extend above the rim of the can. If you use other materials such as muffler wrap or carbon fiber felt it's not going to be efficient. It will burn hot/radical up the sides of the pot more than what you should have. It's a science. "You learn as you burn". :-)

    When we bake we want 2 things, reasonable speed and complete bake in the middle. The angel food cake pan with the cone up the center allows for complete bake in the middle and gives us reduced baking time.

    An aluminum container like you found will take longer to heat up, weigh more in you pack. But that's ok for me :-) Your new found container will work. You need to practice in your kitchen. Use "Everclear" alcohol in a well tuned stove. There are many videos on youtube that have different methods.

    I'm going to start experimenting with the smaller 4" diameter cake pans. I need more practice also with the egg poaching container. hehe, the egg poacher can also be used to pick up the hot handle of the Imusa Mug. It's heavy duty silicone. I like dual purpose items :-) I also am very fond of eggs :-) Poached eggs on toast.....ooohhhh soooo goood

    The cake pan you found looks nice and commercial grade. Nice find.

  5. #45

    Join Date
    05-05-2011
    Location
    state of confusion
    Posts
    9,866
    Journal Entries
    1

    Default

    Hey, I bought a couple of your lids.
    How do you make these, could you easily make a slightly different size?

    I have a Stainless 10cm cup from china, weighs 2.04 oz vs the ~2.7 oz for the IMUSA. Was hoping these lids would fit it too, but they dont. About 1/8" too large. Id love to have a lid like these that would fit it too.

  6. #46
    Registered User Gwilli's Avatar
    Join Date
    11-23-2012
    Location
    West Richland, WA
    Posts
    30

    Default imusa mug

    Received mine last week. I like the mug a lot, but found that the sweet lid that came with it also fits my Snow Peak mug (mini solo) that came in the hybrid summit kit. I've been trying to find some MYOG materials to make a decent lid for it, but no longer!!! Great job and thanks!

  7. #47
    Registered User
    Join Date
    06-12-2006
    Location
    northern illinois
    Posts
    4,536
    Images
    2

    Default

    Quote Originally Posted by MuddyWaters View Post
    Hey, I bought a couple of your lids.
    How do you make these, could you easily make a slightly different size?

    I have a Stainless 10cm cup from china, weighs 2.04 oz vs the ~2.7 oz for the IMUSA. Was hoping these lids would fit it too, but they dont. About 1/8" too large. Id love to have a lid like these that would fit it too.
    Does the white beveled part fit your SS mug? I can make the overall diameter smaller.

    I also have an over supply of 11cm stainless steel mugs that the aluminum lid fits onto. I'll see if I can get a photo of it for you. The stainless mug comes with a 1oz stainless lid compared to 1/4oz weight of the aluminum lid.

    Received mine last week. I like the mug a lot, but found that the sweet lid that came with it also fits my Snow Peak mug (mini solo) that came in the hybrid summit kit. I've been trying to find some MYOG materials to make a decent lid for it, but no longer!!! Great job and thanks!
    That worked out nice for you!!! :-) As time goes by we'll find out that there more pots out there that these lids will fit. :-)

    Hey Dan, I ordered a Simmerlight Stove and Imusa Mug and lid last week and they showed up yesterday. Very good quality on the stove, and I love how that lid really snaps/fits on the imusa mug so well. Ill have to put a review on BPL
    I highlighted in red part of the above quote. That statement didn't mean anything out of the ordinary at the time until today. I was trying lids on different pots and I have an Imusa Mug with a dent in it from the manufacture and the mug is tiny bit oval at the rim. With very little pressure I was able to push the lid down onto the rim so as to make it "snap" into place. turned the mug upside down and lid stays firmly attached. Wow, the light went on So to make your lid a "snap-on" just squeeze your mug rim a little so it's just a tiny bit oval. Notice I say "tiny" bit. With a little pull the lid comes off easily...so you now have a mug that the lid stays put while stored in your pack. This whole mug thing is working out way better than I ever thought. It's so cool
  8. #48
    Registered User
    Join Date
    06-12-2006
    Location
    northern illinois
    Posts
    4,536
    Images
    2

    Default

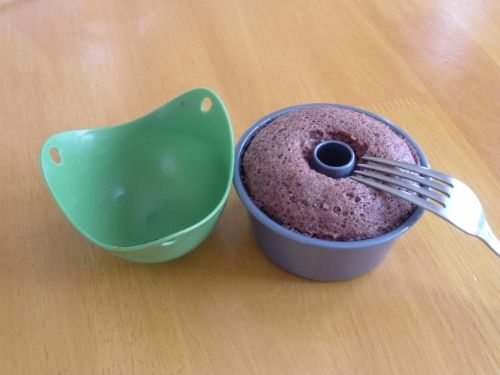
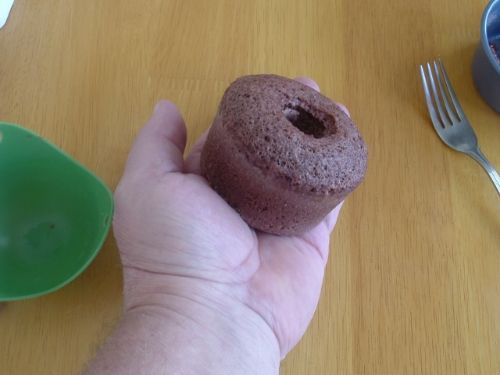
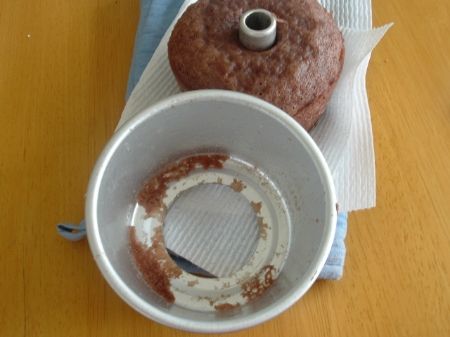
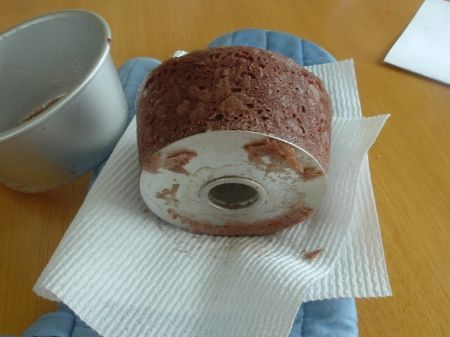
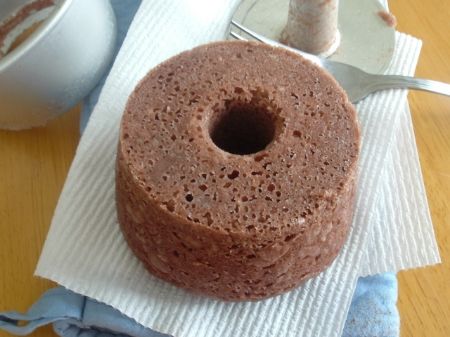
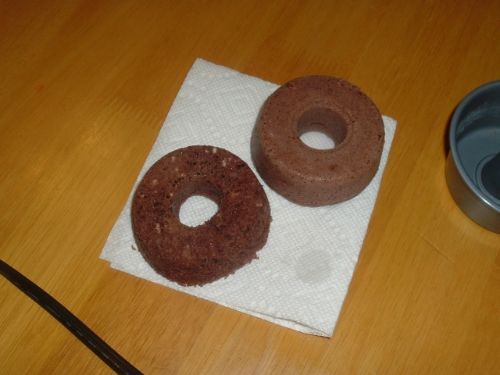
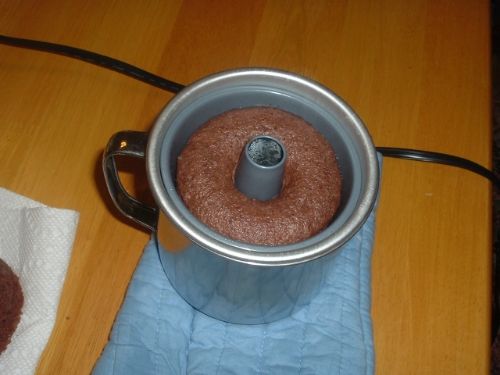
    I baked today. Made 2 donuts. Need to refine the method. I used my kitchen stove, a stainless steel mug, an aluminum angel food cake pan insert and then a angel food non stick pan inside of that. Disregard all the parts I just wanted to test the cake mix and baking time using steam

    1st test was a bake for 4 min.

    Second test was a bake for 6 min with more batter.

    The donuts turned really great tasting and moist.

    I'll probably start a thread next time after all the tests are completed. for now a couple of photos:

    The donut on the left was the 1st, baked for 4 min. The one on the right baked for 6 min.

    The cake batter is 3 parts mix, 2 parts water


  9. #49

    Join Date
    05-05-2011
    Location
    state of confusion
    Posts
    9,866
    Journal Entries
    1

    Default

    Quote Originally Posted by zelph View Post
    Does the white beveled part fit your SS mug? I can make the overall diameter smaller.

    I also have an over supply of 11cm stainless steel mugs that the aluminum lid fits onto. I'll see if I can get a photo of it for you. The stainless mug comes with a 1oz stainless lid compared to 1/4oz weight of the aluminum lid.
    Unfortunately not. The recessed part doesnt go into it, thats whats 1/8" too big. Ive toyed with some ideas of how to make a nice lid, but all involve too much work for a one-off.

  10. #50
    Registered User aclawrence's Avatar
    Join Date
    05-11-2013
    Location
    Florence, AL
    Age
    41
    Posts
    24

    Default

    Congrats on the doughnut success Zelph. Unfortunately, my first attempt the other night during the super bowl was a complete fail lol. I did buy the container in the picture above. I attempted to dry bake some chocolate chip muffin mix. My diy cat food stove got a little out of control. It has worked great for boiling water in my bigger pot but it was overwhelming the Imusa 10cm. The coffee filter that I was using as a liner inside the little muffin pot started smoldering and stunk up the house. My diy stove was burning so hot I could not grab the Imusa to get it off the stove. I used an oven mitt and it burned a hole right the mitt. I was able to use some tongs and grab it and take it outside. On a more positive note the muffin looked like it would have turned out pretty good in my little pot if not for the overall heat explosion.

    Thanks for passing along your cooking progress. In the meantime I need to order a real Zelph stove and avoid my Diy for cooking with. I am not giving up after seeing all the new options for trail food.

  11. #51
    Registered User
    Join Date
    06-12-2006
    Location
    northern illinois
    Posts
    4,536
    Images
    2

    Default

    Quote Originally Posted by aclawrence View Post
    Congrats on the doughnut success Zelph. Unfortunately, my first attempt the other night during the super bowl was a complete fail lol. I did buy the container in the picture above. I attempted to dry bake some chocolate chip muffin mix. My diy cat food stove got a little out of control. It has worked great for boiling water in my bigger pot but it was overwhelming the Imusa 10cm. The coffee filter that I was using as a liner inside the little muffin pot started smoldering and stunk up the house. My diy stove was burning so hot I could not grab the Imusa to get it off the stove. I used an oven mitt and it burned a hole right the mitt. I was able to use some tongs and grab it and take it outside. On a more positive note the muffin looked like it would have turned out pretty good in my little pot if not for the overall heat explosion.

    Thanks for passing along your cooking progress. In the meantime I need to order a real Zelph stove and avoid my Diy for cooking with. I am not giving up after seeing all the new options for trail food.
    I suspect the Super Bowl distracted you and that was the cause of the failure.

    Your next try will be better.

    I'm getting better at it. A 6 min boil makes a cake. I use 1/2 cup water on the bottom of the pot.

    After 6 min. I remove from pot and place into the heavy duty silicone egg poacher. That allows me to hold the hot cakepan and using a plastic spoon, eat right out of the pan. The 1 piece non stick pan makes for easy clean up.

    I'm cooking these test cakes on my kitchen stove. My next tests will be with an alcohol stove to determine how much fuel is needed to do one cake. Once I complete some tests in that fashion I will create a thread in the food forum.

    326-Recipe:
    3/4 cup cake mix
    1/2 cup water
    6 min. boil in mini angel food cake pan.


  12. #52
    Registered User
    Join Date
    06-12-2006
    Location
    northern illinois
    Posts
    4,536
    Images
    2

    Default

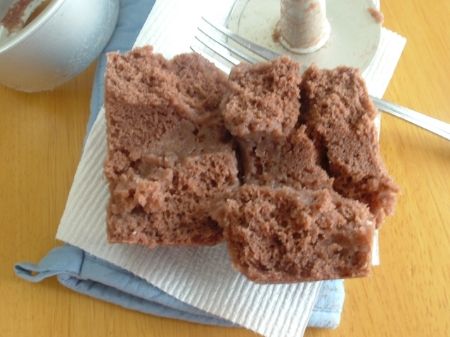
    I used my 2 pice aluminum cake pan....don't like it!!! too messy for clean up.

    Same cake mix and water.

    I used a StarLyte stove for simmering, 1/2 ounce denatured alcohol and steamed the cake for 6 min.


  13. #53
    Registered User
    Join Date
    01-27-2014
    Location
    Indianapolis, IN
    Posts
    2

    Default

    Just a quick note of confidence on my purchase....the lid fit perfectly on the imusa. In fact, I'm in the process of getting another with some extra lids. Great piece of gear at a fantastic price!!

    Aaron.

  14. #54
    Registered User
    Join Date
    06-12-2006
    Location
    northern illinois
    Posts
    4,536
    Images
    2

    Default

    Quote Originally Posted by ab1 View Post
    Just a quick note of confidence on my purchase....the lid fit perfectly on the imusa. In fact, I'm in the process of getting another with some extra lids. Great piece of gear at a fantastic price!!

    Aaron.
    Thank you Aaron for the feedback and your purchases. These mugs are super strong, lightweight and the price is sooooo right.

    The lid deal and mug deal is still going on. The longest Black Friday Sale ever

    Purchase the 1/2oz super light StarLyte stove to compliment the mug. The stove has an integrated pot support.

    http://www.woodgaz-stove.com/starlyte-stove.php

  15. #55
    Registered User
    Join Date
    01-24-2012
    Location
    Cannon Co Tn
    Posts
    108

    Default

    Hey can I still get this Imusa pot and lid?

  16. #56
    Registered User
    Join Date
    06-12-2006
    Location
    northern illinois
    Posts
    4,536
    Images
    2

    Default

    Quote Originally Posted by Altarboy View Post
    Hey can I still get this Imusa pot and lid?
    Hello Alterboy...yes you may still get in on the sale..The price goes up at the end of March. This has been an introductory offer

    http://www.woodgaz-stove.com/imusa-mug-10cm-lids.php

    "BLACK FRIDAY SPECIAL"

    Imusa 10cm Aluminum Mug with Lid

    You get 1 Mug and 1 Lid

    Lid knob is held on with stainless steel screw
    Total weight = 3.0 ounce/85gm
    0.7 Qt

    Sale Price $7.49 + 2.46 shipping = $9.95 total

  17. #57
    Registered User
    Join Date
    01-24-2012
    Location
    Cannon Co Tn
    Posts
    108

    Default

    Duh, I just saw you had already posted its still on. Thank you.

  18. #58
    Registered User
    Join Date
    06-12-2006
    Location
    northern illinois
    Posts
    4,536
    Images
    2

    Default

    Quote Originally Posted by Altarboy View Post
    Duh, I just saw you had already posted its still on. Thank you.
    That's ok

  19. #59
    Registered User brancher's Avatar
    Join Date
    07-16-2004
    Location
    Wilmington/Leland, NC
    Posts
    314

    Default

    HI Zelph,

    I made a cookset based on your inventiveness (got a couple of free Imusas over at HF), made the lids and handles - and I am pleased - however, I am interested in one of your lids for the 12 cm. Do you make lids for the 12's?

    btw, these Imusa sets are great! Extremely light with high capacity and cheap. And, after using just about every alky stove out there, the Fancee Feest you came up with is imho the best of all. Gorgeous blue flame, pretty long burning time, and I especially like the way you can control the flame height by adjusting the pot support height. I was able to dial these in for very small pots as well as the big 1.1's and the wide-body pots. Great going!

    Attachment 26355Attachment 26354

  20. #60
    Registered User
    Join Date
    06-12-2006
    Location
    northern illinois
    Posts
    4,536
    Images
    2

    Default

    Hi "Brancher" nice kit you've put together.

    I'm sorry to say I have not had the time to make lids for the 12cm Imusa mugs.

    On Monday I will have some 4" diameter carbon felt discs that really work well for picking up the mugs by their hot handles.

    I'll also have some pieces that are 4"x6"

    How are you adhering the felt to your mug, what product?

Page 3 of 4 FirstFirst 1 2 3 4 LastLast
++ New Posts ++

Posting Permissions

  • You may not post new threads
  • You may not post replies
  • You may not post attachments
  • You may not edit your posts
  •